Welcome to ClubRunner's BlogSpot


Welcome to ClubRunner's BlogSpot - the place to stay on the pulse of hot off the press news updates about product developments, service announcements, local events and so much more!

Also, you can initiate discussions and share information among fellow ClubRunner users.

Your feedback is always welcome and necessary to help us make ClubRunner better. We want to know what you like, what you don't and what's on your wish list. Please let us know how we can enhance our service.

Saturday, April 26, 2014

Tips for the Week!

Did you know that the Birthdays and Anniversaries widget can also display birthday information for spouses?

As part of our latest software update, we've added the option to display birthday information for spouses as well. Great for adding to your bulletin! This option can be selected by clicking on the cog wheel on the widget to go to the settings page, from where you can simply check the "Show Spouse Birthdays" option.

Did you know that you have the ability to mark a subpage as the default landing page when website visitors click on the Site Page link?

A Site Page allows you to create a number of subpages and related pages as well as allow you to add photo albums, links and files to the pages. Subpages contain important information related to the topic that a Site Page was created for.

As you add more subpages or delete them, you can quickly and easily change your default landing page. To make a subpage the default, click on the subpage from the menu on the left side. When you are in the Edit Site Page screen, you will notice a link on the top titled "Make as Default Subpage", which you can click on to proceed.

Did you know that you can select which photo albums you want displayed on your Photo Albums List page? 
A popular request, you now can choose which specific albums you want to display on the Photo Albums List page, which is accessible from your menu navigation bar. The Photo Albums list page is the built-in page that you can easily add to your menu bar. To add albums to the list page, simply navigate to the Edit Photo Albums link from your Admin page and select the Photo Albums List page filter. From here, click on the "Add Photo Album from Library" button and select whichever albums you want displayed!

Friday, April 18, 2014

Tip of the Week!

Did you know that you now can display your sponsor ads on more pages of your website?

A very popular feature, the Sponsorship module allows clubs to place sponsor ads on their own website as a means of generating revenue for the club. These ads can be text or image ads and clubs can set their own prices and schedule to run these ads. Up until today, clubs had the ability to display their sponsor ads on the home page, all subsequent website pages and the bulletin. As our way of providing you with more custom options, you now have even more control over where to display these ads and can choose from a variety of subsequent secondary pages including the photo album list, speakers list, speakers details page, event details page and more. To view the complete list and choose which pages to display the ads on, simply click on the Sponsor Settings from the Sponsors page.

It's easy to get started! Simply set your price and upload your ads! Even view how well your ads are performing by referring to the built-in hit counter which displays the number of clicks each ad has received.

Click here to refer to our help article on how to upload your sponsor ads.

We're constantly making changes to ClubRunner based on the feedback we receive from you and there's still a lot on the way! If you have a suggestion or feature request you'd like to share with us, email us at feedback@clubrunner.ca.

Friday, April 11, 2014

Tips for the Week!

Clubs using ClubRunner 3.0, did you know that you can now change the color, font, font size as well as add style elements to your story titles?

To give users more control over formatting, we've made it simpler to format story titles. Whereas earlier, any customization required the editor of the story to use HTML tags to apply style elements to the title, you will now see a 'Format Options' link next to the title field. Clicking on it will open a new editor window from where you will be able to easily bold, italicize, underline, change the font, color and size of your title.

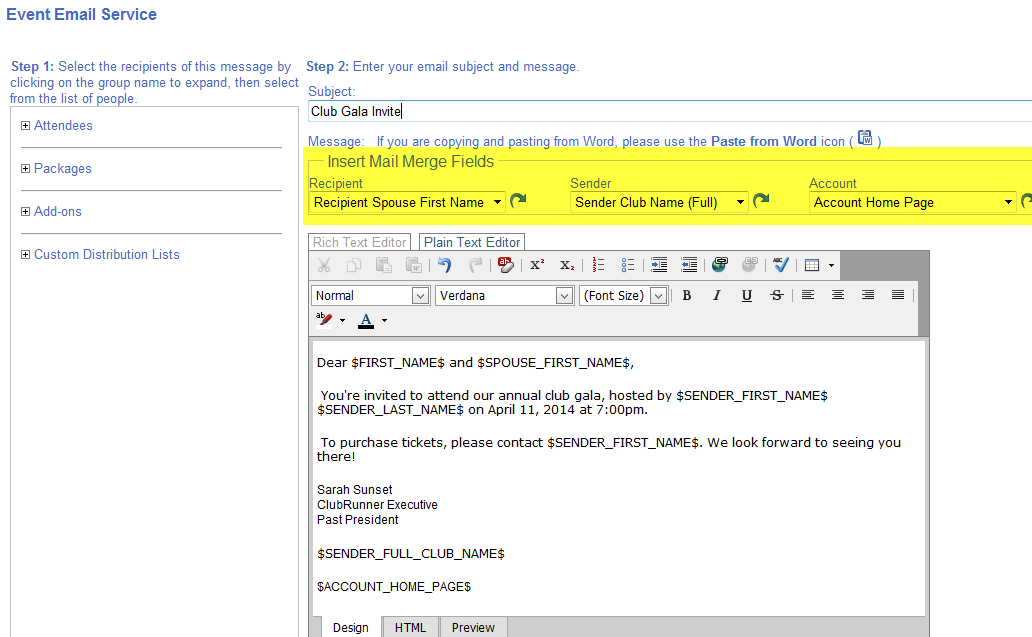
Did you know you can add mail merge tags to your emails to populate the emails you send from MyEventRunner?

That's right! You are now able to further customize your emails and add mail merge tags specific to the recipient, sender and account when emailing registrants from MyEventRunner. You can choose from several mail merge tags including recipient name, recipient spouse name, club name, sender name, account name, and more.

These are just some of the updates we've introduced but there is still a lot on the way! We're constantly making changes to the ClubRunner service. Please continue to share your feedback and feature requests by emailing us at feedback@clubrunner.ca.

Friday, April 4, 2014

Tip of the Week!

Did you know that you can create custom forms using Google Docs for your website?

Apart from the built-in contact forms, there are definitely times your club needs to collect certain information and using a form would be the best method. Customers using Version 3.0 can create and add custom forms to their website with a just few easy steps!

Simply create your form in Google and once completed, copy and paste the source code in a custom widget in ClubRunner. All the responses are saved in your Google account and can be downloaded to Excel at any time. For instructions, please refer to our help article.

Version 3.0 offers a lot of customization options so you can design your website to meet the unique needs of your club. Has your club switched to Version 3.0 yet?

Friday, March 28, 2014

Tips for the Week!

Did you know that you can choose to hide the club motto from appearing on the Club Information Widget?

Clubs on Version 3 can customize their welcome widget even further and now choose whether to hide or display their motto. By default, the setting is set to always display the club motto. To hide it, click on the cog wheel on the widget to go to the properties screen. Under the 'Content Properties' section, you will see a checkbox next to "Show Club Motto". Simply uncheck it to hide it from appearing on the home page.

Did you know that you can customize the padding properties for all standard widgets in Version 3.0?

Due to popular demand, we've added the option to be able to customize the padding properties for all widgets. Top, bottom, left and right padding properties can be defined independently from the Properties screen of each widget, meaning you can control the spacing around each widget, without having to alter any code! Please note, this option is only available for all standard widgets and does not apply to custom widgets.

These are just a few of the changes we've made but there's still a lot more on the way! Have a suggestion you'd like to share with us? Email us at feedback@clubrunner.ca!

Friday, March 21, 2014

Tips for the Week!

Did you know that you can delete both active and inactive events from the Events listing in MyEventRunner?

You asked for it! We're happy to introduce the ability to delete both active and inactive events from your MyEventRunner Events Listing. Under the Actions column, you will see a 'delete' button which will allow you to remove the events you no longer want on your Events listing.


Did you know that you can archive your bulletin directly from the send screen?

A new option on this screen, you now have the ability to archive your bulletin immediately after sending it. To do this, simply select the Archive checkbox under the "Send Your Bulletin" section. Even if you have scheduled your bulletin to be sent at a later date, if this option is selected, your bulletin will be archived immediately.


Did you know that you can cancel incorrect transactions made from within the Dues and Billing module?
We know club treasurers will appreciate this! For cases where the wrong invoice is generated for members, you can cancel the transaction instead of entering a credit or debit transaction to adjust the outstanding balance. To do this, from the Dues and Billing page, click on the 'Cancel Transaction' link on the left column under the Statement section. From here, you will be able to select the member you wish to cancel the transaction for, view their statement, select the transaction date and define the amount that is being voided. All changes will directly be displayed on the member's account statement.

Friday, March 14, 2014

Tips for the Week!

Did you know you that when creating new stories, you have the option to copy an existing story?
Customers using Version 3.0 will now see a new option on the top right of the "Create New Story" page entitled "Copy from an Existing Story". With this option, you have the ability to copy and edit your existing stories and save them as a new story. The copied version will include the story title, brief and content and if the display options such as the author, date or social media button settings were specified, they too will be brought forward to your new story. You can then go in and make changes, add design elements, and have the option to display the story on either your homepage or bulletin.

Did you know you can customize the Club Information Widget with custom links?

That's right! A popular request, we've added the ability to add custom links within the Club Information (Club Meeting Information) widget. Within the widget's property screen, you will see two new fields under the "Content Properties" section: "Custom Link URL" and "Custom link Text". Here you can add a link to any external website or your site/custom pages. The text you input in the Custom link Text field will display on the widget. This option is great for clubs to link to a site page with directions to the club meeting location, or the club's facebook or twitter page, etc.

Saturday, March 1, 2014

Tips for the Week!

Introducing Email Communications 3.0! 

We are proud to introduce our new and improved Email Communications module on Version 3.0! Not only is it faster but it also allows you to have more control over your emails. Upon logging in, you will notice a new link on the Admin Page titled "Email Communications" under the My ClubRunner section. To transfer over your emails from the old Version 2.0 system to this, you will see a button titled "Migrate Emails" which will automatically transfer all the emails and drafts that were created in the past 3 months. For the time being, you can continue to use the Version 2.0 system as well however please note that emails created using this new system will not display on the Version 2.0 system.

Similar to your website and bulletin layout options, did you know that you can now pick from two more fresh new layout options to design your custom pages? 


That's right! Based on your suggestions, we introduced new templates to the Website and Bulletin designer earlier last month. Now, these options are also available for all custom pages that you design! To view and apply these templates to your website, simply click on the "Content Templates" button when you are in the designer screen. You will see these templates described as "Narrow Left, Wide Right and above Full Width and Full Width above Equal Left and Right".

We look forward to receiving your feedback on the new Email Communications module! Please continue to send us your suggestions and feedback to feedback@clubrunner.ca

Friday, February 14, 2014

Tip of the Week!

Did you know you can customize the content in the text version of your bulletin?

As part of email best practices, ClubRunner always sends out a text version of your bulletin for email clients that cannot render HTML email. We recently introduced the ability to customize the content in the text version of your bulletins.
You will notice a link titled "Text Version" on the top right of your bulletin editor, which will allow you to create and edit text versions of your newsletter.


What is a Plain Text Bulletin?

A plain text bulletin is an email that does not contain any images or text formatting. When creating your bulletin using the Bulletin Designer, you are creating an HTML version of your bulletin, complete with formatting and imagery.

Because emails are viewed on different email clients and devices, with plain text emails, you can be assured that no information is lost in translation.

Why is a Text Version Important?

Although, creating and editing the text version is optional, it is highly recommended as recipients that have email clients that do not render HTML emails will not be able to see your bulletin content. Some browsers or settings on email clients such as Outlook don’t support HTML versions of emails. When this is the case, the recipient receives the text version of your email instead.

Additionally, if your HTML email is content heavy (bulletin contains a lot of information and images), and it is not supported by a text version, spam filters are more likely to mark your email as spam, which means the recipient might not receive your email.

For help on creating and editing your bulletin, refer to our help articles on our knowledgebase.

Monday, February 10, 2014

Tips for the Week!

Introducing the Website Designer 3.0 Help Tour!


Upon logging into your website, webmasters will notice a new interactive tour option to learn more about Website Designer 3.0. An easy way to learn more about the Website Designer in Version 3.0, this tour covers each section and goes over every element found in the Designer screen. The tour starts off by covering general items, such as how to change your website layout, banner and footer. It moves on to then cover how to add widgets, the options available to you and more. Finally, the tour concludes by going over how to view your changes and then publish them.

You have the option to open the tour at any time, by clicking on the  "Start Tour" button, which will appear on the top right of the Website Designer screen, upon clicking on 'Edit Content'.

Did you know you can now easily share the content on your website on various social media channels?

You asked for it, and we delivered! Upon adding a new entry onto your website, you will notice a social share toolbar appear at the bottom of the page, which will allow your website visitors to share the content on that page on various social media channels. The social share toolbar currently appears on the following pages:
  • Story Pages
  • Event Details Page
  • Speaker Details Page
  • Site Page
  • News Detail Page
  • Photo Album Page
Therefore, for every new story, event, speaker, site page, news or photo album that you add, the social share toolbar will automatically appear on those pages. To add the toolbar to existing pages, you would simply need to republish them. This toolbar, will allow visitors to share your website content on Twitter, Facebook, LinkedIn, Google +, Blogger, Pinterest and via email.

These are just a few of the exciting updates we've made but there's still a lot more coming your way. Stay tuned! Have some feedback on features you would like to see in ClubRunner? Please don't hesitate to email us at feedback@clubrunner.ca.